In a recent post covering top tips for photographing waterfalls I referenced a technique known as long exposures. There is no clear cut definition on how long your shutter should remain open in order to be classed as a long exposure however I typically consider this as shots that last for one second or longer.
For waterfalls, long exposures are commonly used to smooth the surface of the water in order to create a beautiful, silky effect while the rest of the scene is sharp and in focus. However, this is only one of a number of applications for this technique. From capturing seascapes and landscapes to motion blur, light trails, star trails, the Milky Way or the Northern Lights, long exposures can turn average images into amazing images.
What’s more, this technique is easy to learn so read on to find out how.
Before I start it is important to quickly touch upon the basics of how most cameras work and how they interact with light. Light is essentially the fundamental principle of photography and impacts not just how the image looks but how it is captured. When you understand how to control it your images can make a dramatic improvement.
In very simple terms (as this varies slightly depending on the type of camera), light reflects off the subject you are photographing and enters the camera’s lens. It bounces off the mirror and prism into the viewfinder you are looking through. When the shutter is pressed, the mirror lifts so that the light is directed onto the camera’s sensor and the image is recorded.

Pre Shutter press. Photo: Ilford Photo

On Shutter press. Photo: Ilford Photo
How that image appears is dependent on just how much light there is. For this tutorial I’ll use the example of capturing cityscapes in low light.

Cityscape in low light
If you have ever tried to shoot in a city at night your images may appear very dark with little or no detail. They may also be blurry or full of an unpleasant speckled effect known as ‘noise’.
These things occur because the camera is trying to compensate for the lack of available light the best way it knows. The amount of light let into the camera can be controlled by several factors – all of which you can manage yourself to achieve better shots. These are the “3 pillars of photography” and are common terms you will encounter:

ISO Shutter Aperture. Photo: Imgur.com

Cityscape after sunset
So with a basic awareness of those 3 pillars we turn our attention to ‘available light’. In other words, the amount of light (either artificial or natural) entering your camera. Depending on the effect you are trying to achieve, along with available light, will determine how the above elements are used.
Using our cityscape example again. After sunset, and once the sun has dipped far enough below the horizon, the sky starts to take on a blue hue. This gets deeper and darker the further the sun sinks below the horizon. This is often referred to as the ‘blue hour’ (the period of twilight after sunset). Often street, vehicle and building lights will come on in cities (or become more noticeable). This is the perfect time to shoot long exposures to get the cleanest images.
This is because as available light decreases you need to compensate for this in the camera. One option is to widen your aperture but for cityscapes you ideally want to use a narrow aperture to keep as much of the scene in focus. You can also increase your ISO but in doing so you will add more noise to the image. This effectively leaves exposure time. A longer shutter speed will let more light into your camera while maintaining clean images (providing your camera is stable).
For long exposures it is essential to stabilise the camera (ideally on a tripod) in order to avoid any movement and then use a combination of all three variables (ISO, aperture and shutter speed) to achieve the optimum image quality.
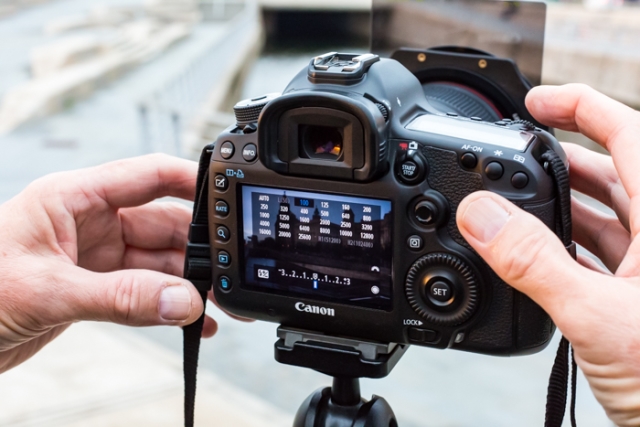
A good way to get started is to fix the lowest native ISO (typically 100), select a narrow aperture (somewhere between f/11 and f/16) and then adjust the exposure based on the scene, the available light and what you are trying to achieve from the shot. This could range from a few seconds to a few minutes.
All the variables can be tweaked or adjusted to get your desired output. For example, as natural light decreases, or if you find the length of the exposure to be unpractical, simply increase the ISO slightly or widen the aperture. Both of which can reduce the length of exposure needed to let in a similar amount of light.
Now compare your long exposure to a handheld shot of the same scene. Not only is your long exposure sharper with better focus, it should have a lot less noise and be better exposed across the whole scene. With less available light the benefits and differences become even more pronounced.
Note: If it is daytime, for example shooting waterfalls, landscapes or seascapes, then a long exposure can blow out part or your entire image making it too bright and losing the detail in the highlights. You can combat this using an ND filter which is a dark piece of glass you place over the end of your lens reducing the amount of light that enters.
With the above things in mind it is now time to take control of your camera and try some long exposures yourself. There are a few things you will need to get started.

All images copyright Matt Parry unless otherwise indicated.
Matt Parry's images and articles have been published in leading travel and photography publications. He has visited over 50 countries across six continents during which his passion for photography evolved from a way to showcase his trips to become the driving force behind where and why he travels. You can see more of his images and follow his travels on Facebook (www.facebook.com/mattparryphoto) or on his website: www.mattparryphotography.com.
